Slow-Cooked Lamb & Chickpea Curry (Bengali Mangsho Ghugni)

A bowl of delicious Lamb & Chickpea Curry made with steel food cans including diced tomatoes, chickpeas, and tomato paste, highlighting the sustainability of the ingredients used. The cans are made of up to 35% recycled steel and can be recycled over

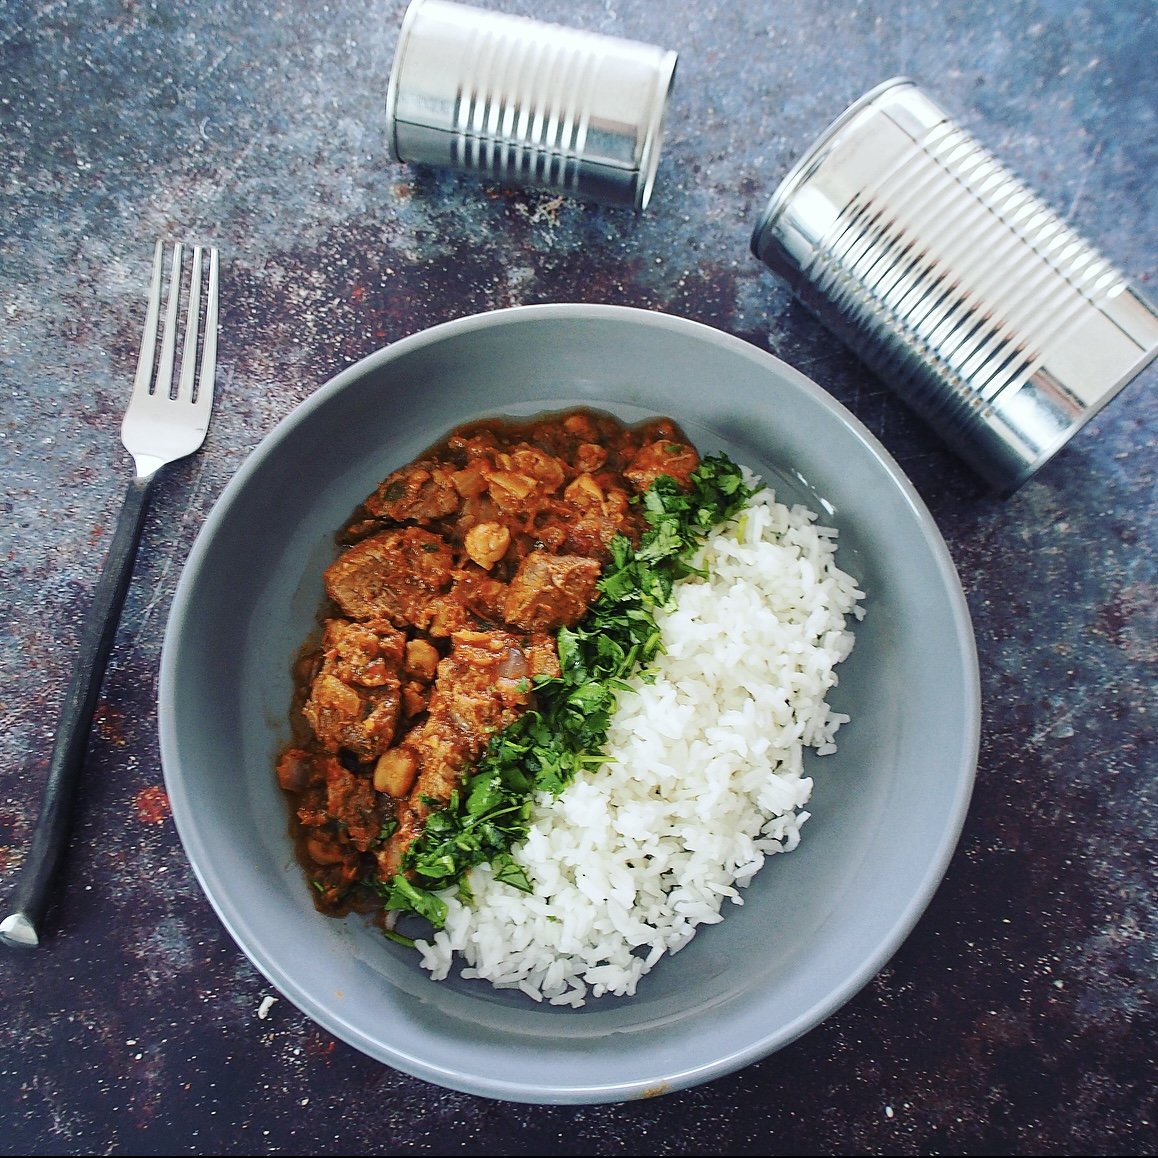
Sustainable Bengali Lamb & Chickpea Curry made with steel food cans of diced tomatoes and chickpeas. Served with rice, garnished with cilantro and lime wedges.

It’s the middle of April and you know what that means? It’s Earth Day Week!

One of my favorite ways to celebrate Earth Day is to make recipes that emphasize sustainability. So while Adrian was busy outdoors with a beach cleanup this weekend, I was doing my part in the kitchen by making this awesome Lamb & Chickpea Curry!

By using three steel food cans in its ingredient list, including diced tomatoes, chickpeas, and tomato paste, this delicious, mouth-watering curry represents sustainability to me, as the cans are not only made of up to 35% recycled steel, but they can be recycled over and over again, with no downgrading of material.

Equally important, steel food cans are amazing by saving over 2.2 billion pounds of food waste each year. While it sounds like an incredible amount of waste when you think about it, it totally makes sense why steel food cans are food waste superheroes –  they keep foods fresh longer, and are ready to use when you need to use them. No additional waste or special care is needed!

If you’re looking for other ways to celebrate Earth Day, look no further than this recipe, and check out this Recycling Tips page on how to choose steel food cans.

Slow-Cooked Lamb & Chickpea Curry (Bengali Mangsho Ghugni)

Adapted from Thali by Maunika Gowardhan

Time: 1 hour, 30 minutes
Serves 4

Ingredients
4 garlic cloves
2 tbsp fresh ginger, roughly chopped
3 tbsp olive oil
2 dried bay leaves
4 cloves
4 green cardamom pods, whole
1 medium white onion, thinly sliced
2 bird’s-eye chillies, cut lengthways
1 tbsp ground coriander
1 tsp ground cumin
½ to 1 tsp Kashmiri chili powder, depending on spice preference
1 (14.5 oz) can diced tomatoes
2 tsp tomato paste, from a can
1 ½ lb boneless leg of lamb, cut into bite-size chunks 
2 cups water
1 tsp sugar
Kosher salt, to taste
1 (14.5 oz) can chickpeas, drained
½ tsp garam masala
1 red onion, finely chopped
2 tbsp freshly squeezed lime juice

To Serve
Roughly chopped cilantro
Lime wedges
Basmati or jasmine rice

Preparation Steps
In a blender, blend the garlic and ginger to a smooth paste, then set aside.

Heat the oil in a large, heavy-based saucepan over a medium heat. Add the bay leaves and whole spices and, as they begin to sizzle, add the white onions. Fry for 6–8 minutes, stirring often, until golden.

Add the garlic and ginger paste, along with the green chillies, and fry for a few seconds, then add the ground coriander, cumin and chili powder and stir well. Add the tomatoes and cook for 4 minutes, scraping the bottom of the pan. Add a splash of water if it is sticking to the base. Add the tomato paste and stir well.

Now add the lamb and stir to coat in the spices, sauteeing for 5–6 minutes. Add the water and sugar and season to taste. Bring to a boil, then cover and simmer over a low heat for 40 minutes, stirring halfway through.

Add the chickpeas, cover and continue cooking for 20–25 minutes, or until the lamb is tender. Stir a couple of times to make sure it doesn’t stick to the bottom of the pan. Add the garam masala and red onion. 

Turn off the heat and serve warm over rice. Garnish with cilantro and lime wedges. 


If you loved this recipe, you will love my recipes for Indian Spiced Meatball Curry, Trader Joe’s Thai Chicken Curry, and Indian Spiced Vegetable Soup!

Comment


Print

Harissa-Marinated Chicken with Red Grapefruit Salad

What better way can you treat yourself than with a healthy meal at the end of a long week?

Lately, I've found that a great way to decompress is spending more time cooking! Instead of 20-minute meals on a weeknight, I've been enjoying longer stints in the kitchen, building depths of flavor that can be hard to come by in less time.

This recipe, from Ottolenghi: The Cookbook, takes some time and effort, but I found the entire cooking process to be meditative. I loved roasting peppers over an open flame, toasting aromatic spices in a skillet, and bringing it all together with a spicy harissa marinade that the chicken soaked up in the refrigerator overnight.

After roasting the chicken the next day, it's a simple process - segment out some grapefruit and make a sweet and tart grapefruit sauce. Then add all the ingredients over a bed of arugula salad, and voila! So yum and satisfying.

Harissa-Marinated Chicken with Red Grapefruit Salad
from Ottolenghi The Cookbook

Serves: 4

Ingredients
Harissa marinade
1 red bell pepper
1⁄4 tsp coriander seeds
1⁄4 tsp cumin seeds
1⁄4 tsp caraway seeds
1⁄2 tbsp olive oil
1 small red onion, coarsely chopped
3 cloves garlic, coarsely chopped
2 mild fresh red chiles, seeded and coarsely chopped
1 dried red chile, seeded and coarsely chopped
11⁄2 tsp tomato paste
2 tbsp lemon juice
1⁄2 tsp salt
1 tbsp Greek yogurt
13⁄4 lb / 800 g organic or free-range chicken thigh meat (8 to 10 thighs)

Red grapefruit salad
2 red grapefruits
4 oz / 120 g peppery wild arugula
1 tsp olive oil
coarse sea salt and freshly ground black pepper

Sauce
2⁄3 cup / 150 ml pink grapefruit juice
generous 1⁄2 cup / 130 ml lemon juice
2⁄3 cup / 150 ml maple syrup
1⁄4 tsp salt
pinch of ground cinnamon
1 star anise

Directions
To make the marinade, over the flame on a gas stove top or under a very hot broiler, roast the red pepper until blackened on the outside. This typically takes about 8 minutes on an open flame or 15 to 20 minutes under a very hot broiler. Place the pepper in a bowl, cover with plastic wrap, and leave to cool. Peel the pepper and discard the seeds.

Place the coriander, cumin, and caraway seeds in a dry frying pan over low heat and toast lightly for 2 minutes. You should be able to smell the aromas of the spices. Transfer them to a mortar and grind to a powder with a pestle.

Heat the olive oil in a frying pan, add the onion, garlic, and fresh and dried chiles, and fry over medium heat for 6 to 8 minutes, until they turn a dark, smoky color. Now blitz together all the marinade ingredients except the yogurt in a food processor or blender; you will have a pure harissa paste.

To marinate the chicken, mix the paste with the yogurt and use your hands to rub it all over the chicken thighs. Layer them in a plastic container, seal, and refrigerate overnight.

The next day, to make the grapefruit salad, take each grapefruit and use a small, sharp knife to slice off the top and tail. Now cut down its sides, following its natural lines, to remove the skin and white pith. Over a small bowl, cut in between the membranes to remove the individual segments. Squeeze any remaining juice into a bowl and keep it to make up the 2⁄3 cup / 150 ml juice required for the sauce.

Preheat the oven to 425°F / 220°C. Lay out the marinated chicken pieces, spaced well apart, on a large baking sheet and place in the hot oven. After 5 minutes, lower the oven temperature to 350°F / 180°C and cook for another 12 to 15 minutes, until the chicken is almost cooked through. Now place the chicken under a hot broiler for 2 to 3 minutes to give it extra color and cook it through completely.

Meanwhile, place all the sauce ingredients in a small pan and bring to a light simmer. Simmer for about 20 minutes, or until reduced to one-third.

To serve, toss the arugula and grapefruit segments with the olive oil, salt, and pepper. Pile in the center of 4 serving plates, put the warm chicken on top, and drizzle about 1 tablespoon of the sauce over each portion.


Comment


Print

Peruvian Nicoise Salad

A vibrant Peruvian Nicoise Salad, artistically plated with colorful ingredients, including red leaf lettuce, halved boiled eggs, olives, and green beans and potatoes. The dish is garnished with fresh herbs and drizzled with the huancayo-style sauce, showcasing a tempting fusion of Peruvian flavors and classic Nicoise elements.

If you’re looking to add some excitement to your cooking routine, why not try making a Peruvian twist on a classic Nicoise Salad with Diamond Crystal Salt?

Perfect for home cooks of all skill levels, Diamond Crystal Salt Co. offers a variety of salts that can help bring out the flavors in any dish. For this recipe, I used three different types of Diamond Crystal Co. Salt: Kosher Salt Flakes, Coarse California Sea Salt, and Coarse Himalayan Pink Salt. Each type of salt has its unique benefits and can help take your Peruvian Nicoise Salad to the next level.

Three types of Diamond Crystal Co. Salt in small bowls - Kosher Salt Flakes, Coarse California Sea Salt, and Coarse Himalayan Pink Salt.

A close-up shot of the three types of Diamond Crystal Co. Salt used in the Peruvian Nicoise Salad: Kosher Salt Flakes, Coarse California Sea Salt, and Coarse Himalayan Pink Salt. The salts are displayed in their original containers, which offer distinct textures and colors. They bring a rich variety to the dish.

Using Kosher Salt Flakes in the huancayo-style sauce is a game-changer. The flakes offer more control over the amount of salt added, so you don't have to worry about oversalting your sauce. Plus, Diamond Crystal Co. Salt Flakes are available in three different sizes, so you can choose the perfect one for your needs

Creamy, golden huancayo-style sauce in a dipping bowl, infused with Kosher Salt Flakes.

A creamy and delectable huancayo-style sauce, with its smooth texture and inviting golden hue, elegantly presented in a small dipping bowl. The sauce is garnished with a sprinkle of Kosher Salt Flakes, showcasing its importance in achieving the perfect balance of flavors.

Coarse California Sea Salt is the perfect finishing salt for this dish, adding a touch of crunch and flavor to the potatoes and green beans. It's also domestically sourced, so you can feel good about supporting local producers when you use it. And if you're worried about running out of Coarse California Sea Salt, Diamond Crystal Co. Salt offers it in a 2 lb refill box to ensure you never run out.

Seasoned potatoes and green beans with glistening Coarse California Sea Salt crystals.

A top-down view of the tender, golden potatoes and bright, crisp green beans, seasoned to perfection with Coarse California Sea Salt. The salt crystals glisten atop the vegetables, hinting at the added crunch and burst of flavor they contribute to the Peruvian Nicoise Salad.

Coarse Himalayan Pink Salt is not only delicious, but is also sustainable. By purchasing refillable grinders and refill boxes, you can support sustainable practices while enjoying the unique flavor and beautiful color of Himalayan Pink Salt.

Using Diamond Crystal Co. salts in this Peruvian Nicoise Salad recipe is a fun and easy way to add a twist to a classic dish. So, what are you waiting for? Spice up your cooking routine and impress your family and friends with a delicious Peruvian Nicoise Salad made with Diamond Crystal Co Salt

For more on where you can purchase these products, visit Diamond Crystal Salt Co.’s Where To Buy tool and get ready to stock your pantry!

Peruvian Nicoise Salad

Adapted from The Fire of Peru: Recipes and Stories from My Peruvian Kitchen

Serves: 4
Time: 45 Minutes

Ingredients

Potatoes and Green Beans
1 ¼ lb mixed fingerling potatoes
1 tsp Diamond Crystal Salt Co.coarse California sea salt
3 slices bacon, chopped into ½-inch pieces
½ lb green beans, trimmed

Salad
About 3 tbsp olive oil
5 cups mixed baby greens, loosely packed 
Diamond Crystal Salt Co. coarse sea salt
Extra-virgin olive oil
4 hard-boiled eggs, halved lengthwise
½ cup Botija (brine-cured Peruvian black olives) or cured Mediterranean olives, drained 
Generous pinch of shichimi togarashi or cayenne pepper

Huancayo-Style Sauce
10 soda crackers, such as saltines
⅓ cup whole milk 1⁄4 cup olive oil, or more if needed
½ medium red onion, roughly chopped
3 to 4 tbsp homemade ají amarillo paste
¾ cup feta cheese or queso fresco, cut into small chunks
½ tsp Diamond Crystal Salt Co. Kosher Salt Flakes

Directions
For the potatoes and green beans: Add potatoes and Diamond Crystal Salt Co. coarse California sea salt to a medium-sized pot. Cover them with an inch of water and bring to a low boil over high heat. Cook the potatoes for 20-25 minutes or until they are tender when pierced with a knife. Drain the potatoes and let them cool in the strainer before halving them lengthwise. Set them aside. 

In a medium-sized skillet, fry the bacon until it is crisp and drain on paper towels. 

For the green beans, prepare a large bowl of ice water. Bring a medium pot of water to a boil, then reduce the heat to maintain a simmer. Blanch the green beans until they are tender-crisp, about 1 minute. Drain the green beans and immediately transfer them to the ice water to cool. Once cooled, drain the green beans and transfer them to a paper towel-lined bowl to dry.

To make the salad: Heat a large sauté pan over medium-high heat, about 2 minutes. Pour about 2 tbsp olive oil into the pan and heat for an additional minute. Then, add the green beans and sauté, tossing occasionally until they are charred in spots, about 30 seconds. Transfer the beans to a bowl. Next, add 1 tbsp olive oil to the skillet and sear the potatoes, cut-side down, for about 1 minute or until golden brown. Set aside.

To make the Huancayo-style sauce: Crumble the crackers into a small bowl and pour milk on top. Mix the crackers and milk together and set aside. Heat a large skillet over high heat for about 2 minutes. Add the olive oil and heat for another minute. Stir in the onions and ají amarillo paste and sauté the onions until they begin to soften and are nicely browned along the edges, about 5 minutes.

Transfer the onion mixture to a blender and puree it on high speed until it has the consistency of a chunky salsa. Partially open the top of the blender and, with the blender running, slowly pour in the cracker-milk mixture. Then, add the feta and Diamond Crystal Salt Co. kosher salt flakes. Keep the blender going until the sauce is very creamy, about 30 seconds. Taste the sauce and add more salt flakes if needed. The dressing should be thick. Season with additional salt flakes if desired.

To finish the salad, arrange the salad greens on a large serving plate or individual plates. Finish the greens by lightly sprinkled with Diamond Crystal Salt Co. coarse Himalayan pink salt and drizzle lightly with extra-virgin olive oil. Arrange the potatoes, green beans, eggs, and olives alongside the greens. Pour a generous ½ cup of the Huancayo-style sauce on the potatoes and scatter the bacon over the salads. Finally, sprinkle all ingredients with a pinch of shichimi togarashi and serve the remaining Huancayo-style sauce on the side.

If you loved this recipe, you will also enjoy my recipes for Peruvian-Style Steak with Aji Amarillo Mashed Potatoes, Sopes with Potato-Chorizo Hash and Real California Queso Fresco, and Grilled Skirt Steak Salad

Comment


Print

Spicy Vegetarian Tortilla Soup

A bowl of vegetarian tortilla soup, topped with shredded cheese, cilantro, and a crispy tortilla stripS. The soup is a deep red color, and filled with tender chunks of tomatoes, corn, and beans.

As February is National Canned Food Month, what better way to celebrate than with a delicious and environmentally friendly recipe - like this Spicy Vegetarian Tortilla Soup? It’s delicious, easy, and environmentally friendly because steel food cans are used to package its ingredients. 

One thing that I love about purchasing foods in steel cans is that the cans are infinitely recyclable, with no downgrading of material, which means they can be recycled over and over again. In fact, steel food cans have the highest recycling rate of any food packaging, with a recycling rate of 58%. One super fascinating factoid that I recently learned is that 75% of all steel ever produced is still in use today. That’s pretty incredible.

A bowl of vegetarian tortilla soup sits on a table next to several steel cans. The soup is a deep red color and filled with tender chunks of tomatoes, corn, and beans.

But that's not all steel food cans are good for. They also help fight food waste by keeping food fresh longer, so you can use them whenever you want without any waste or special care required. In fact, steel food cans prevent 2.2 billion pounds of food waste every year.

When it comes to this Tortilla Soup recipe, using steel food cans for the corn, beans, tomatoes, broth, and chipotle chiles in adobo ensures that they'll stay fresh and flavorful until you're ready to use them. Plus, once you're done with the cans, you can recycle them, knowing that they’ll continue to be useful as the steel can be used again and again.

A bowl of vegetarian tortilla soup filled with hearty and nutritious black beans. The beans are soft and creamy, providing a great source of protein and fiber to the dish.

So why not give this recipe a try today? It's easy to make, delicious, and good for the planet! And if you want to learn more about the benefits of steel food cans, head over to cannedgood.org!

A close-up of the rich and flavorful broth in the vegetarian tortilla soup. The broth is made with a combination of vegetable broth and chipotle chiles, giving it a smoky and spicy flavor.

Spicy Vegetarian Tortilla Soup Recipe

Time: 40  minutes
Serves 6

Ingredients
2 tbsp olive oil oil
1 yellow onion, chopped
1-2 finely serrano peppers, finely chopped and seeded
Kosher salt and freshly ground pepper
6 cloves garlic, roughly chopped
1-2 tsp ground chili powder
2 chipotle peppers in adobo sauce, finely chopped
1 (28-ounce) can whole peeled tomatoes
2 (14.5-ounce) cans vegetable broth or stock
1 (14.5-ounce) can black beans, drained and rinsed
2 (14.5-ounce) cans whole corn kernels, drained and rinsed
Canola oil for frying
8 (5-inch) white corn tortillas, cut into 2 ½-inch x  ¼-inch strips
Kosher salt

To Finish
Avocado, cut into ½-inch pieces 
Sour cream
Crumbled cremoso queso fresco or feta cheese
Finely chopped red onion
Serrano peppers, sliced into thin rounds (optional)
Radishes, sliced into thin rounds
Finely chopped fresh cilantro
Lime wedges

Directions
Heat olive oil in a large pot or Dutch oven over medium heat. Add the chopped onion, serrano peppers, and season with kosher salt and freshly ground pepper. Saute for 5 minutes or until softened. Add garlic, and cook while stirring occasionally until fragrant, about 1 minute. Add ground chili powder and stir to mix well and toast the spices. Add the canned chipotle peppers and stir, followed by the canned tomatoes. Bring to a boil and reduce to a simmer. Season with salt and pepper and cook for 4 to 5 more minutes, stirring occasionally and breaking up the whole tomatoes with the back of a spoon.

Pour the canned vegetable broth, black beans, corn, and two cups of water into the pot. Bring the soup to a boil and then reduce the heat to low. Allow the ingredients to simmer for 15 to 20 minutes.

Meanwhile, warm up about 1 inch of canola oil in a large skillet or Dutch oven. Heat the oil to 375℉. Divide the tortilla strips into four batches, and fry one batch at a time, until golden brown and crisp, about 2 to 3 minutes per batch. Transfer the tortilla strips to a paper towel-lined plate and sprinkle with salt.

Divide the soup into bowls and top with sliced avocado, sour cream, queso fresco, red onion, serranos, radishes, and cilantro. Top with fried tortilla strips and serve with lime wedges on the side.


If you loved this recipe, you will also enjoy my recipes for Chipotle-Spiced Bean Tacos, Ropa Vieja, and Chipotle Chicken Tacos!

Comment


Print

Cranberry-Glazed Turkey Thighs with Swiss Chard and Polenta

This is a picture of crispy and browned oven-roasted turkey thighs served over a bed of polenta with swiss chard and a cranberry glaze.

If you’re looking for last-minute Thanksgiving recipes, I’ve got you covered with this recipe for Cranberry-Glazed Turkey Thighs with Swiss Chard and Polenta! 

Although we love to go all-out for the holiday whenever we can, we’ve decided to keep things simple this year as we’re only cooking for a small gathering. Instead of roasting turkey for several hours and serving it alongside an abundance of side dishes, we’re packing our menu with flavor, technique, and high-quality ingredients instead!

The star of our Thanksgiving menu is the turkey thighs – brined in advance, the thighs are pan-fried in French butter, which add an amazing depth of flavor and also allow the turkey to brown beautifully before being roasted in the oven and basted with all of the pan’s buttery juices. And, the great thing about roasting thighs over a whole turkey is that these steps come together in just 25 minutes!

The polenta and swiss chard cook up even more quickly, and also as deliciously, because we infuse them with plenty of French butter. Not only does it allow for a richer and creamier flavor than most butters, but as a dietitian, I love knowing that I’m adding additional calcium and vitamin D to the dish as well!

Last but not least, the cranberry glaze cooks up in no time and pairs so well with all of these Thanksgiving flavors.

I hope you get a chance to cook it up this week, and when you do, let me know what you think!

To find more about the benefits of cooking with European butter, feel free to head over tasteeurope.com! You can use the store locator to find out where you can find your favorite butter near you.

Cranberry-Glazed Turkey Thighs with Swiss Chard and Polenta

Time: 1 Hour
Serves 4

Ingredients
Salt
½ cup granulated sugar
3 lbs bone-in, skin-on turkey thighs (4 medium thighs)
¾ cup balsamic vinegar
12 oz fresh cranberries
Zest of 1 orange
1 stick cinnamon
¾ cup light brown sugar
½ tsp fresh rosemary, finely chopped
Freshly ground black pepper
5 tbsp French butter, divided
¼ cup shallots, finely chopped
6 garlic cloves, chopped
3 bunches Swiss chard, stemmed, roughly chopped
3 tbsp olive oil, divided
1 cup polenta
¼ cup grana padano or parmesan cheese, grated

Directions
Prepare a wet brine by bringing six cups of water to a boil in a medium saucepan. Stir in ¾ cup of kosher salt and ½ cup sugar until dissolved. Remove from heat and add 4 cups of cold water and a pint of ice cubes.

Add the turkey thighs to a large bowl and pour over brine. Transfer thighs to refrigerator and let brine for 30 minutes.

Meanwhile, rinse out the saucepan used for the brine and return to stove. Bring balsamic vinegar, cranberries, orange zest, cinnamon, light brown sugar, rosemary, ¼ cup water, ¼ tsp salt, and 1/8 tsp freshly ground black pepper to a boil. Reduce heat to medium-low and simmer until cranberries burst and the sauce thickens, about 10 minutes. Set cranberries aside and allow to cool.

In a large skillet or Dutch oven, heat 1 tbsp French butter over medium heat. Add shallots and garlic and cook until the shallots are translucent, about 5 minutes. Stir in chard with 1 tbsp water and cook, stirring, until chard is tender, about 8 minutes. Remove from heat and transfer to a plate and keep warm. Remove thighs from the brine and pat dry with paper towels. Season with salt and freshly ground pepper to taste. 

Preheat oven to 400°F.

Wipe skillet clean with paper towels once cooled and heat 2 tbsp olive oil over medium-high heat. Add the turkey thighs skin-side down. Set a heavy pan over the thighs and cook for 2-3 minutes until the skin is golden and crisp. Flip the thighs over on the other side, adding 1 tbsp olive oil and 2 tbsp French butter. Spoon accumulated juices over the turkey and cook until browned on the opposite side, about 2 minutes. Transfer thighs to a baking sheet, pouring over the buttery juices.

Roast thighs for 14-16 minutes or until the internal temperature reaches 165°F. Transfer thighs to a platter, pouring over juices and covering with aluminum foil. Allow thighs to rest for 5 minutes and keep warm.

While turkey roasts, prepare polenta by whisking 1 cup of water, 1/2 tsp salt, and 1 cup polenta in a small bowl. Bring 3 cups of water and ½ tsp salt to a boil. Stir in polenta, cover, reducing heat and simmering for 10-15 minutes until the water is absorbed. Remove from heat and stir in 2 tablespoons of French butter and grated cheese until melted.

Spoon polenta onto plates and top with chard. Serve turkey thighs over polenta and chard and drizzle with the cranberry glaze.


Comment


Print

Meal Planning Made Easy, The Diet Assassinista Way!

Note: This post is sponsored by BabbleBoxx

This past week, we cooked up a storm in the Diet Assassinista kitchen! From stir-fries to roasted fish, pasta, and curry, our fridge and pantry have been brimming with seriously tasty ingredients. 

But how did we get from point A, identifying what we want to make, to point B, adding the foods to our grocery list? This is a question I get asked a lot, so I figured I’d give you a glimpse into how it works in our kitchen.

First, we chose to base our meals around a few delicious and convenient products that we had on hand: coconut aminos, tahini, hazelnut spread, flavored almonds, and Minute Rice!

Second, now that it’s Spring, our major inspiration was our garden where our arugula and parsley are growing like weeds. Knowing we had time to cook about four meals this week and prepare a couple wholesome snacks, we methodically built our grocery list. 

We first chose our proteins that would pair well with our pantry of products and fresh vegetables – poultry, fish, cheese, and sausage. Then we browsed our recipe library and decided on a couple recipes we’ve cooked before – stir-fried honey chicken and roasted arctic char and selected a couple that were new to mix things up – mattar paneer and pasta with sausage and arugula. Last but not least, we planned our snacks to include avocado, since our tree is full of ripe ones, and fresh fruit!

As usual, all of this planning went to good use because we had a game plan that made one week’s worth of cooking a breeze. So without further ado, let me share with you the highlights of our week:

Pasta with Sausage, Arugula, and Flavored Almonds

New to our recipe repertoire, we made Pasta with Sausage and Arugula. But we adapted the recipe to include a frico with Recipe 33’s seriously delicious garlic and dill flavored almonds. You can tell these almonds are made with real ingredients because they absolutely took this recipe to the next level! The pasta cooked up to about six servings, so we had food for a couple days, which gave us one night off from cooking. Yay!

[Check out Recipe 33’s Special Offer: Save $2.00 on any 4oz bags by clicking here to buy the flavored almonds and using the code TryRECIPE33].

Mattar Paneer with Minute Rice

While we’ve made mattar paneer before, we wanted a quick weeknight recipe to pair with our Minute Rice. This recipe was wholesome and tasty, and within 45 minutes, we cooked the meal and had all the dishes cleaned up! And this was another dish that was great for a couple days of leftovers.

Minute rice is such a great product to have on hand. Cooking up in just 60 seconds, it’s perfect for nights when we’re short on time, and is BPA-free and 100% recyclable. Minute rice also pairs well with so many of our favorite weeknight dishes, including another recipe we made this week, stir-fried honey chicken with bok choy!

Avocado Halves with Coconut Aminos

Speaking of our stir-fry staple, which is similar to this one, we often forget that it’s best to marinate the chicken for at least 30 minutes before preparing everything else. Often, that leaves us a little hungry before dinner is ready.

But this week, coconut aminos saved the day! Having it on hand for the stir-fry, as it’s a 1:1 soy sauce replacement, we simply sliced and pitted a ripe avocado and poured in the sauce, which makes for such an amazing snack. With 72% less sodium than soy sauce, there’s nothing like Coconut Secret’s sauce because it’s packed with umami flavor and a slight hint of sweetness. 

Arugula Salad with Tahini

With our plan to cook another weekly staple, roasted arctic char, we wanted fresh greens to go on the side! So we paired our home-grown arugula with Mighty Sesame Tahini, which is so creamy and super easy to use, unlike other tahinis! Instead of spooning tahini from a jar, all you have to do is shake the bottle, squeeze, and enjoy! 

I love having this stuff on hand because it’s super creamy and nutrition packed. Plus, it helps me put a delicious salad together in no time. 

Bananas and Strawberries with Hazelnut Spread

And now onto snacks! In 2022, I’ve been committed to getting back into a serious running and strength training program. 12 weeks in, I find that I really need some healthful snacks to keep me energized between meals. 

So this week, I chose to pair Nutiva’s Classic Hazelnut Spread with bananas and strawberries. This spread has 40% less sugar than the leading brand, is certified organic, vegan, and best of all, really hits my sweet spot! I also love Nutiva’s products in general because of their commitment to regenerative farming practices, which go hand-in-hand with creating healthier communities. 

All in a Day’s (or Week’s) Work!

While our weeks tend to be busy between work, socializing, and getting in some exercise, we always commit some time to the kitchen to ensure that we’re getting in meals and snacks that support a healthy lifestyle. But that doesn’t mean we have to spend ALL of our time in the kitchen with meal prep and clean up.

So my advice to those who want to get into meal planning is that by keeping convenient ingredients in your pantry like coconut aminos, tahini, Minute Rice, flavored almonds, and hazelnut spread, you can ensure that your week of cooking and snacking as nutritious as it is tasty!


If you loved the recipes and produmentioned in this post, you will also love my recipes for: Hearts of Palm Pasta with Sausage Ragu, Stir-Fried Mushrooms and Tofu with Bok Choy, Easy Coconut Shrimp Curry, and Roasted Trout with Herbs and Summer Squash! 

Comment


Print

Australian Grassfed Steak Tacos

These are Australian grassfed beef tacos. They're made with strip steak and served over a street style corn tortilla with a cilantro mayonnaise sauce. They're garnished with radishes and nasturtiums.

I’ve got just the recipe for your next Taco Tuesday! These strip steak tacos are so juicy and absolutely perfect for your summer cooking endeavors. Served up with a tangy tomatillo salsa, cilantro mayo, and fresh radishes and greens, they’re handheld and as easy to eat as they are to put together.

One technique I like to use when I make this dish is to dry brine the steak. It sounds fancy, but it’s super simple: all you do is season the steak with salt and allow it to absorb into the protein for 1-3 days. Somehow, by the magic of nutrition science (osmosis and diffusion), this process enhances the flavor of the steak tenfold! The results are tender, mouthwatering, and allow for a perfectly seared crust!

Steak tacos are best with Australian grassfed beef because it’s lean, clean, and best of all – nutritious! Whether you’re looking to focus on lean protein for performance, or following a high-protein diet, you can find grassfed beef from Australia at your local supermarket.

Australian Grassfed Steak Tacos

Time: 30 Minutes + Dry Brining (optional)
Serves 4

Ingredients
2 Australian grassfed strip steaks, about 1 ½ lbs
Kosher salt
1/2 cup mayonnaise
1 tbsp capers, drained
2 cloves garlic
½ bunch cilantro
Extra virgin olive oil
1/2 tsp lime juice
Canola oil, for frying
12 small corn tortillas
A handful of small nasturtiums or baby arugula
4 radishes, thinly sliced
1 tsp white wine vinegar
2 medium tomatillos, finely diced
Juice of 2 limes
4 Lime wedges, for serving

Directions
Generously season the Australian grassfed steaks with 3/4 tsp salt on all sides. Cover and transfer to refrigerator to dry brine overnight.

Remove steaks from refrigerator and trim off fat. Transfer fat to a large heavy skillet or Dutch oven. Heat skillet and fat over low heat and cook until the fat renders enough to cover the bottom of the pan, about 10-15 minutes. Transfer any remaining fat pieces to a plate.

In the same skillet, heat rendered fat on high heat and add steak to the pan, working in batches if necessary to avoid overcrowding the pan and ensure that a crust forms. Sear on one side for 3 minutes, without moving the steak. Turn over and cook for another 2-3 minutes. Transfer steak to a platter and let rest for 10 minutes.

In a blender, add mayonnaise, capers, garlic, cilantro, 4 tbsp olive oil, and lime juice and blend on high until the mayonnaise reaches a smooth consistency. Fold in more mayonnaise if needed and season with salt and pepper.

Heat enough canola oil to line the bottom of a small skillet and heat over medium heat. Add one tortilla at a time, and fry on each side, flipping with tongs, about 20-30 seconds, until crisp. Transfer to a paper towel-lined plate, separating each tortilla with a paper towel to blot out excess oil. Keep warm.

In a small bowl, combine nasturtiums, radishes, and white wine vinegar. Season with salt and pepper to taste.

Once the steak has rested, dice steak into 1/2-inch cubes. Combine with reserved pieces of fat if desired (they taste soooo good!). Add to a bowl with tomatillos, lime juice, and 1 tbsp olive oil. Season to taste with salt and pepper.

Prepare tacos by spreading cilantro mayonnaise over each tortilla. Top with Australian grassfed steak and follow with nasturtiums and radishes. Season to taste with salt and pepper. Serve with lime wedges on the side.


Ropa Vieja

This is Ropa Vieja, a cuban stew that is usually cooked for hours over the stove. This is a quick Ropa Vieja recipe, however, because it is made in the pressure cooker, which saves on time. A great summer dish, it's served with black beans and fried plantains.

Ropa Vieja is one of Cuba’s national dishes and is hands-down a seriously delicious stew that’s big on taste with tomatoes, bell peppers, and spices. My go-to protein for this recipe is Australian grassfed flank steak because it’s high-quality and a simple, healthy swap that trims the fat without sacrificing flavor! When you’re craving a savory stew in summer, this is the dish that will hit every taste bud and will come together perfectly as you cook (and dance!) with a little Cuban music in the background.

Ropa Vieja translates to “old clothes” in Spanish because after hours of cooking, the flank steak resembles clothing that’s been worn for a long time. My friend, and future cousin-in-law, inspired me to cook this dish for the first time a few years ago and I’ve been cooking it ever since. It’s a recipe that her Cuban grandmother and aunt would make for her growing up when she visited Miami in the summer. Her aunt likes to call the dish Ropa de Vieja, which is a naming I can definitely get behind because it naturally rolls of the tongue.

My personal preference is to cook Ropa Vieja in the pressure cooker because it saves a lot of time and means I can make it on a weeknight! If you don’t have a pressure cooker, save this for the weekend and stew the steak for a few hours until it's beyond tender.

For more on where to buy Australian grassfed flank steak for your next Ropa Vieja cooking adventure, visit the Where to Buy page. You’ll be sure to cook this dish for many summers to come!

Ropa Vieja with Australian Grassfed Flank Steak

Time: 45 Minutes
Serves: 6-8

Ingredients
1 ½ lbs Australian grassfed flank steak
1 ½ tsp kosher salt
½ tsp freshly ground black pepper
2 tbsp canola oil, divided
1 large yellow onion, thinly sliced
6 cloves garlic, finely chopped
1 green bell pepper, thinly sliced
1 red bell pepper, thinly sliced
2 tsp dried oregano
2 tsp dried thyme
2 tsp ground cumin
2 tsp smoked paprika
1 cup dry red wine
1 (15 oz) can whole tomatoes
3 tbsp tomato paste
1 cup beef broth
1 bay leaf
1 tbsp white vinegar
½ cup pimiento-stuffed Spanish olives, halved

To Serve
Steamed rice
Fried plantains
Canned black beans
Fresh parsley, roughly chopped

Directions
Season Australian grassfed flank steak with kosher salt and freshly ground pepper. Heat 1 tbsp canola oil in a 6-quart pressure cooker over medium-high heat. Add steak and brown on each side, about 2-3 minutes. Transfer to a plate.

Add an additional 1 tbsp oil in the pressure cooker over medium high heat and stir in onions, garlic, and bell peppers. Sauté until the onions have softened, about 4 minutes. Stir in oregano, thyme, cumin, and paprika and sauté until fragrant, about 30 seconds. Add wine and simmer until most of the liquid has evaporated, about 2 minutes.

Add tomatoes, tomato paste, beef broth, and bay leaf to the pressure cooker. Simmer for 2 minutes, breaking up tomatoes with a spoon. Return steak and accumulated juices to the cooker. Cover and secure pressure cooker with lid and increase heat to high. Once the pressure cooker whistles over high pressure, reduce the pressure to low and cook for 25 minutes. Remove from heat and allow to cool before removing lid.

Reheat the stew uncovered over medium heat. Season with salt and pepper to taste. Stir in vinegar and olives and simmer for 5 minutes to allow flavors to combine.

Serve stew over rice with fried plantains and black beans on the side. Garnish with parsley. Enjoy!


Comment


Print

Australian Grassfed Beef Burger with a Summery Corn & Avocado Salad

df

I hope everyone’s Fourth of July weekend is going amazing!

Adrian and I have been grilling up a storm and that means we’re cooking with Australian grassfed beef. We decided to make these Aussie burgers a little tangy with pickled red onions, a little smooth with guacamole and cheddar cheese, and also a little spicy because – well, that’s what our taste buds love! The flavors of this burger are out of control and are all thanks to sustainable Australian grassfed beef because it always ups the ante on our go-to grilling favorites, from burgers, to steaks, to skewers and tri-tip. 

While burgers always steal the show when it comes to cookouts, this salad deserves some serious accolades as well – it’s so fresh, so sweet, and oh-so-perfect for summer.

To find out more about Australian grassfed beef, which is high-quality, nutritious, and better for the environment, check out True Aussie Beef and Lamb’s website!

Australian Grassfed Beef Burger with a Summery Corn & Avocado Salad

Time: 40 minutes
Serves 4-6

Australian Grassfed Beef Burger
½ small red onion, thinly sliced
3 tbsp fresh lime juice, divided
2 large ripe avocados, pitted, skin removed
3 tsp garlic, finely chopped, divided
Kosher salt
Freshly ground black pepper
1 lb Australian grasssfed ground beef
1/2 cup bread crumbs
1 egg
1 tbsp chili powder
½ tsp cumin
4 slices sharp cheddar cheese
2 medium beefsteak tomatoes, sliced
4 brioche hamburger buns, lightly toasted if desired

Summery Corn & Avocado Salad
½ red onion, finely diced
2 cups fresh corn kernels
3 tbsp fresh lime juice
¼ cup extra virgin olive oil
½ tsp ground cumin
¼ tsp kosher salt
1/8 tsp freshly ground black pepper
2 large ripe avocados, pitted, skin removed, cut into thick slices
1 medium English cucumber, thinly sliced
½ pint cherry tomatoes, halved
2 cups baby arugula leaves
¼ cup mint leaves, roughly chopped
2 ounces queso fresco, crumbled
1/8 tsp red pepper flakes, optional

Directions
In a small bowl, combine red onion with 1 tbsp lime juice. Set aside and allow the flavors to meld.

Add avocado to a medium bowl with 2 tbsp lime juice, and 1 tsp chopped garlic. Gently mash into guacamole with a fork until just combined. Season to taste with salt and pepper.

Prepare the salad ingredients by combining the red onion, corn kernels, lime juice, olive oil, cumin, salt, and pepper in a medium bowl. Add avocado slices to a large platter, followed by the sliced cucumbers and tomatoes. Season with salt to taste.  Arrange arugula leaves on top of the vegetables. Finally, spoon over the corn mixture and garnish mint, queso fresco, and red chili flakes, if using. Transfer to the refrigerator until ready to serve.

Preheat grill over high heat.

Combine the Australian grassfed ground beef in a large bowl with 2 tsp garlic, breadcrumbs, chili powder, cumin, ¾ tsp salt, and ¼ tsp freshly ground black pepper. Divide the beef mixture into four equal portions and shape into patties.

Add burger patties to the grill and cook until the internal temperature reaches 135°F for medium-rare or 145°F for medium, about 5-7 minutes. Transfer to a plate.

Arrange the Australian grassfed beef patties over brioche buns. Top with cheese, tomato slices, guacamole, and pickled onions. Serve on plates with the corn and avocado salad. Enjoy!


Comment


Print

Szechuan Beef Lettuce Wraps with Australian Grassfed Beef

Szechuan-Beef-Lettuce-Wraps-with-Australian-Grassfed-Beef.jpg

Summer is upon us and that calls for quick, “handy” meals that we can eat wherever summer takes us! Whether we’re at the beach, pool, park, or at a backyard cookout, it’s as much fun to put together handheld foods as it is to enjoy them.

Taking less than 15 minutes to prepare, these spicy and oh-so-delicious lettuce wraps come together in a flash! They’re also made with Australian grassfed ribeye, which gives them a “good for you, good for the planet” upgrade having been sustainably raised in Australia.

I love eating lettuce wraps like these in summer because that’s when my weekly meal plans get a little off track – between summer travels, visiting friends, and attending weddings, it’s nice to have some simple go-tos that you can put together without a hassle. There’s also very little clean up – yay!

For your next summer adventure, I encourage you to cook up these Szechuan Beef Lettuce Wraps with Australian Grassfed Beef! They’re sure to hit the spot and are packed with just the right amount of spicy Szechuan flavor. You can find out more about where to buy Australian grassfed beef by visiting the Where to Buy page. Pro tip: It’s as simple as a trip to your local grocery store!

Szechuan Beef Lettuce Wraps with Australian Grassfed Beef

Time: 15 Minutes
Serves 4

Ingredients
Canola oil
1 ½ lb Australian grassfed ribeye steak, cut into ¼-inch strips
2 large red chilies, finely sliced
1 tbsp ginger, grated
3 garlic cloves, finely chopped
2 tbsp hoisin sauce
½ tsp Szechuan pepper
1 ½ tsp kosher salt
1 cup green onions, finely sliced
1 large head iceberg lettuce, leaves separated

Directions
Heat ¼ cup canola oil in a large wok over medium-high heat. Add half of the Australian grassfed beef and cook, stirring quickly for 1 minute. With a slotted spoon, transfer beef to a plate. Drain excess fat and set aside. Repeat with the remaining half of the beef.

Wipe the wok clean and heat 2 tbsp canola oil over medium heat. Add the chilies, ginger, and garlic, and stir-fry for 30 seconds. Return the beef to the wok and stir in hoisin sauce. Stir-fry for 30 seconds. Add Szechuan pepper and salt and stir-fry for an additional 30 seconds. Finally, add green onions and stir through to combine.

Serve Australian grassfed beef by spooning over lettuce leaves. Garnish with additional Szechuan pepper and salt if desired. 


If you loved this recipe, you will also love my recipes for: Filipino Bistek with Aussie Grassfed Beef Tenderloin, Thai-Style Aussie Grassfed Beef Strip Steak, Grilled Aussie Grassfed Skirt Steak Salad